Image Map
Showing posts with label Wall Art. Show all posts

Thursday, October 24, 2013

Spooky Spider Clock

How do you know when its time for Trick-or-Treating? By looking at your cute Spooky Spider Clock, of course!! This cute and classy clock was an upcycle project from Just a Girl and its the perfect addition to your Halloween decorations!

halloween craft

With just a few easy steps and less than $5 you can make yourself one of these cute clocks! Click here to see the full tutorial!

 photo TheWellCraftedHome_zps26a4d5c3.png

Monday, October 21, 2013

Halloween Spider Art

Using old materials for new crafts is the definition of being creative! I love how the crew over at Our Pinteresting Family used old cabinets to create this cute and decorative halloween spider art!


I love how it is pretty and spooky all at the same time! Head on over to their site for the full tutorial!

 photo TheWellCraftedHome_zps26a4d5c3.png

Thursday, August 30, 2012

Well Crafted Wednesday {Features}

I am changing the way that Well Crafted Wednesdays works and I'm going to start featuring the most clicked links from the previous week on Tuesdays! This week, however, I was pretty unprepared so I am featuring them on Thursday instead.

Here we go!


This lovely creative project is from Lindy at Itsy Bitsy Paper! When I become a mom, I want to be one of those moms that does sweet things for everyone who positively influences my child - especially their wonderful teachers! What better way to do that then by giving them "sweet" gifts! Thank you to Lindy for sharing these wonderful printables!
Speaking of having little ones some day, I hope to have some beautiful art like this in my cutie-pie's room! Thanks to Jen at The Consigner Designer I now know how to make this! :) Thank you!!


 photo TheWellCraftedHome_zps26a4d5c3.png

Tuesday, July 17, 2012

Well Crafted Wednesdays #12! {Link Party!}

Welcome to another great week of Well Crafted Wednesdays!!! I hope that the heat where all of you are is bearable and you are able to enjoy your summer days. Here in Seattle, it is hovering right around 80 which is on the warm side for us!

I know I didn't post any project that was made by me this week but I have a couple of big projects coming up that I can't wait to show you and they are taking all the time that I have!!

Now on to the featured links from last week!


If you were featured above, please grab the button below! :)

The Well Crafted Home

If you are new to the party, welcome!!! I am so excited to have you! The more the merrier so please spread the word!


PARTY RULES ***PLEASE READ***

1: Please follow my blog!
2: Please grab my button bellow!
3: Please no giveaways or link parties!
4: Please visit your fellow party attendees! We all love comments :)

PLEASE GRAB THE BUTTON BELOW AND LETS PARTY!!

The Well Crafted Home


 photo TheWellCraftedHome_zps26a4d5c3.png
****Just a reminder that Google Friend Connect is going to be discontinued!! If you would like to continue following my blog, you can do so by joining BlogLovin! {It's awesome!} You can click here to find my blog****

Sunday, July 8, 2012

Made By Me Mondays #10: Flower Art!

OK so I got a little impatient this week and I posted a tutorial about my DIY Ombre Spoons on Friday. I couldn't wait! I love them so much :)

I have another project to share with you today that I love just as much though! Check out the new art that I made for my bathroom!


I had made this art and it was taking me a while to get it up on the walls but then I came home and my sweet hubby hung it up for me as a surprise! And in true "Lauren" fashion, it took me FOREVER to notice it! Haha! I never catch on to the important things quickly...

Anyways, on to the tutorial!

Here are the supplies you need for this project:

     1) Hot Glue (This is used for the borders of the petals. I tried to use Elmer's Glue first but there were a few things wrong with it. It kinda expanded into the borders of the other petals around it and made it look like a big blob and it also dried flat. We want the glue to act like a "fence" around the color of your petals so don't use Elmer's glue!!)
     2) 3 canvases (whatever size you want)
     3) White Paint
     4) Colored paint (I chose purple!)
     5) Paint Brush

Step 1)
   
     Plug in your hot glue gun and make the center of your flower on one of the sides of one canvas. Then do all the leaves fanning out from it. Only do a border for your leaves so that you can fill them in with paint later!


Step 2)

     Paint all three canvases a VERY light shade of the color that you chose. This will serve as the background color of your painting and it will also be the color of a few of your petals. Make sure to paint all the way up to the edge of your petals!

Step 3)

     After your background paint dries, start darkening your paint little by little. Every step you take towards a darker color, paint a few random leaves here and there.

Step 4)

     Once all of your petals are filled in and the paint is dry, go over the hot glue parts with white paint to make the petals pop!


There you have it!

Here are some more pictures:
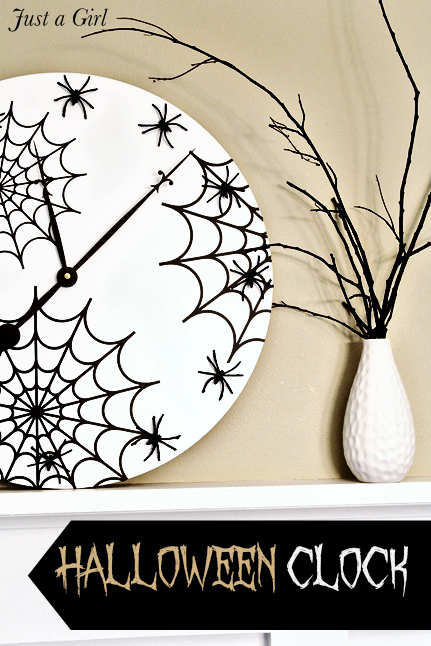
 photo TheWellCraftedHome_zps26a4d5c3.png
****Just a reminder that Google Friend Connect is going to be discontinued!! If you would like to continue following my blog, you can do so by joining BlogLovin! {It's awesome!} You can click here to find my blog****